
Your AI Chat Bot handles most shopper questions on its own. You still want to know when it gets an answer wrong, and you want shoppers to reach a real person when the AI can’t help. This guide shows you how to collect thumbs-up and thumbs-down ratings, ask shoppers what went wrong, hand shoppers to your team, and get an email summary of every handoff.
Prerequisites
- Customer feedback works on every StoreAgent plan.
- Support escalation and escalation emails need the Growth plan or higher.
- A support page, contact form or help desk page that shoppers can open without logging in.
Step 1: Open the feedback settings
- In your WordPress admin, go to StoreAgent → Settings.
- Click the AI Chat tab.
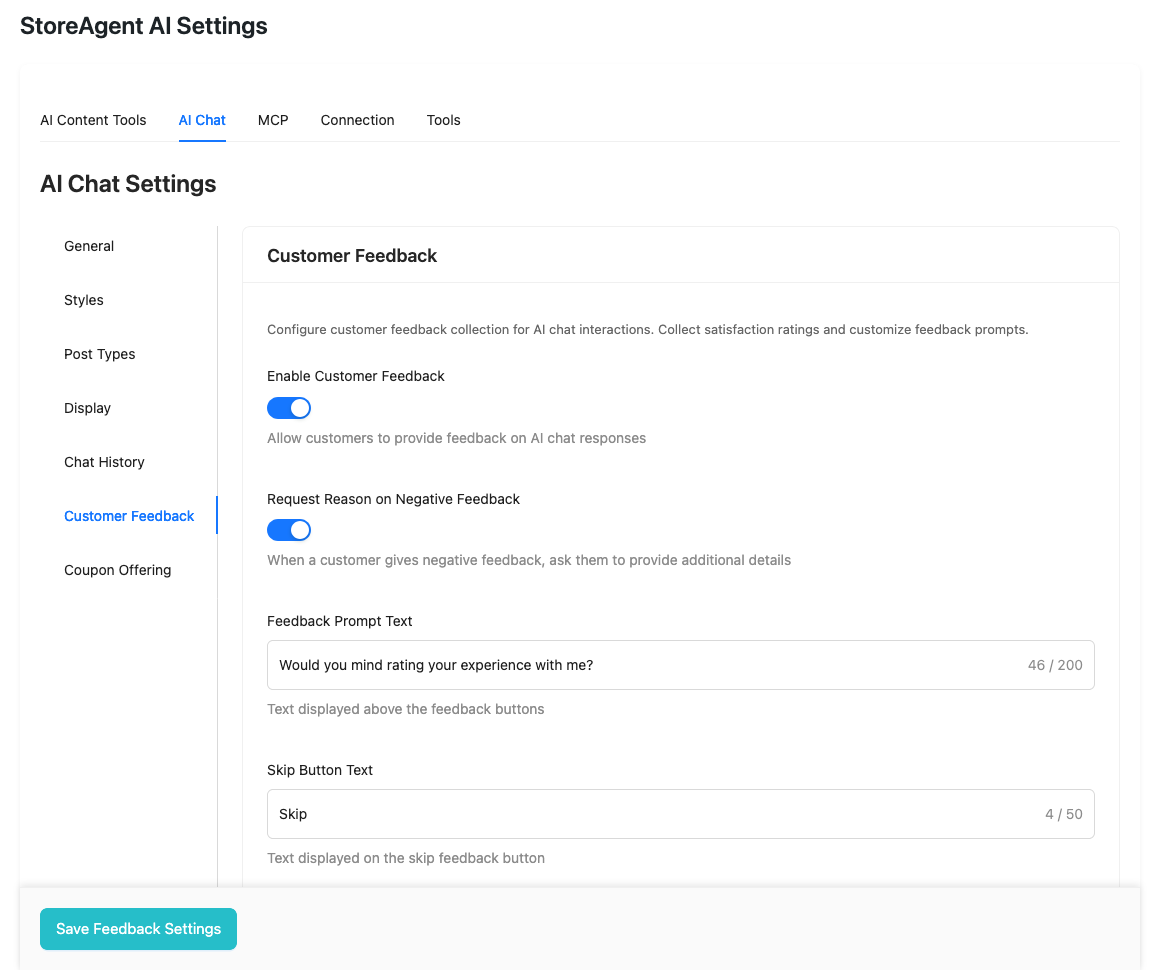
- Click the Customer Feedback sub-tab.
Step 2: Turn on customer feedback
- Turn on Enable Customer Feedback.
- Thumbs-up and thumbs-down buttons appear under an AI reply once the AI has fully answered the shopper’s question.
- The other feedback fields only show after you turn this on.
- (Optional) Edit Feedback Prompt Text.
- This is the question shown above the rating buttons.
- Limit: 200 characters.
- Default: “Would you mind rating your experience with me?”
- (Optional) Edit Skip Button Text.
- Limit: 50 characters.
- Default: “Skip”. Some stores change it to “Not now”.
- Click Save Feedback Settings.
Step 3: Ask for context on negative ratings (optional)
Request Reason on Negative Feedback is on by default. When a shopper taps thumbs-down, the AI can ask them what went wrong. Their answer is saved in the conversation, so you see the actual complaint, not just a thumbs-down.
To turn it off, switch off Request Reason on Negative Feedback, then click Save Feedback Settings.
Step 4: Set up support escalation
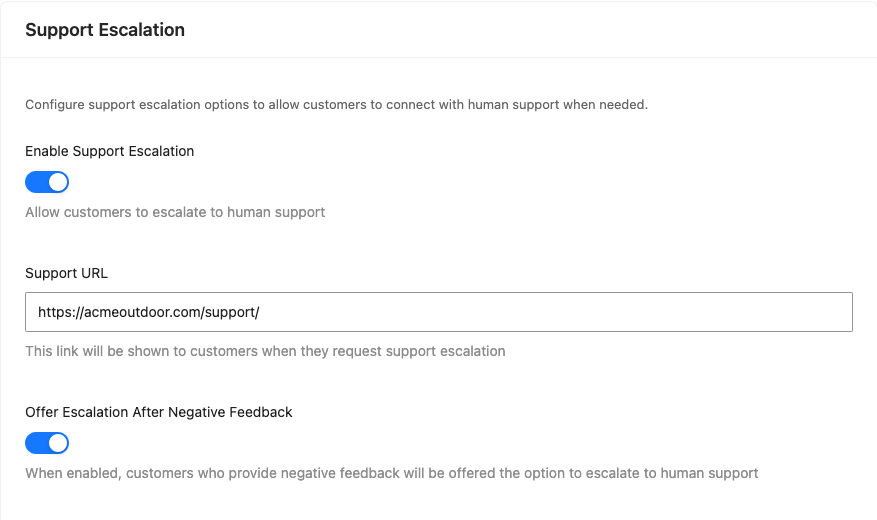
Support escalation gives shoppers a way to reach your team when the AI can’t help. The settings are in the Support Escalation section, below the customer feedback settings on the same sub-tab.
- Turn on Enable Support Escalation.
- Enter your support page address in Support URL.
- Use the full address, including
https://. - The chat widget links shoppers to this page when they ask for help from a person.
- Use the full address, including
- Leave Offer Escalation After Negative Feedback switched on, or turn it off.
- It’s on by default.
- When it’s on, shoppers who give a thumbs-down are offered the support link.
- It only shows when Enable Customer Feedback is also on.
- Click Save Feedback Settings.
Step 5: Email a chat summary to your team (optional)
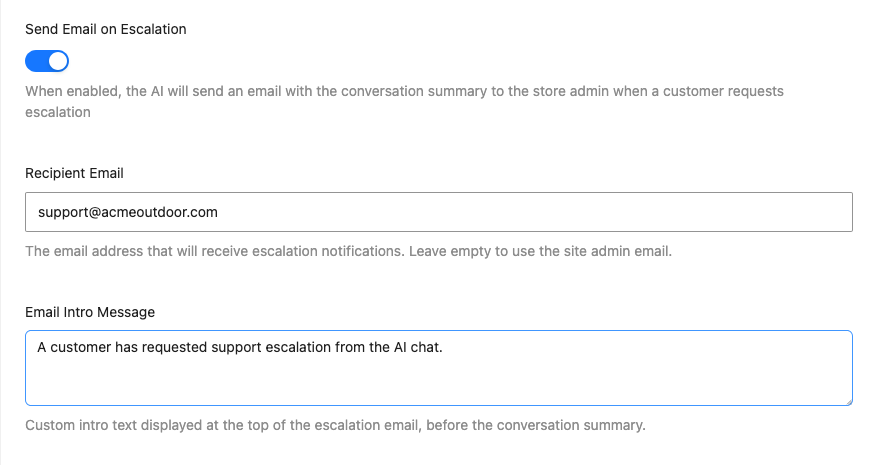
When a shopper escalates, StoreAgent can email you an AI-written summary of the conversation, so you have the full context before you reply.
- Turn on Send Email on Escalation.
- (Optional) Enter an address in Recipient Email.
- Leave it empty to send to your site admin email.
- (Optional) Edit Email Intro Message.
- This text appears at the top of the email, before the summary.
- Default: “A customer has requested support escalation from the AI chat.”
- Click Save Feedback Settings.
The email is sent from your site admin email address, under your store name. Its Reply-To is set to the shopper’s name and email, so when you click Reply in your inbox, your message goes straight to the shopper. If the shopper isn’t logged in, the AI asks for their email address before it sends the summary.
Tracking chat-influenced orders
StoreAgent counts how many AI replies a shopper saw in their session and saves that number on their WooCommerce order. The count is stored in the order’s metadata under _saai_response_count. Order analytics tools, plugins and custom reports can read it to connect revenue to chat sessions.
If the shopper got no AI replies, StoreAgent doesn’t add the count to the order. So an order with a count means it followed a chat conversation. The count is kept in the shopper’s WooCommerce session and resets after each order.
Troubleshooting
I get a 500 error when I save feedback settings, but the values do persist
Update StoreAgent to version 1.1.6 or later, then save your feedback settings again. Versions before 1.1.6 returned a 500 error even though the settings saved correctly. If the error still shows after you update, open a support ticket and include your StoreAgent and WordPress versions.
Thumbs-up/down buttons don’t appear in the chat widget
Check that Enable Customer Feedback is on and saved. Reload the settings page to confirm the switch stays on. The buttons only show after the AI fully answers a question, so test with a simple question and let the AI finish. If they still don’t show, clear your site cache, because page caches can serve an old copy of the chat widget for several minutes after a settings change. If the buttons still don’t show, open your browser’s DevTools console on a store page and look for JavaScript errors from storeagent-ai-for-woocommerce.
Shoppers can’t reach the support page from the chat widget
Check the Support URL field in the Support Escalation section. Enter the full address, including https://. A partial address like /support isn’t accepted. Open the URL in a private browser window to confirm it loads without a login.
Escalation emails aren’t arriving
Check that Send Email on Escalation is on and saved. Then check that WordPress can send mail: install WP Mail Logging or a similar plugin and trigger an escalation from the chat widget on your store. If the log shows the email was sent but it never arrives, the problem is your mail server (SPF, DKIM or blocklists). Use an SMTP plugin like WP Mail SMTP to send through a dedicated mail service.
Each chat session can send up to 3 escalation emails per hour. Extra requests in that hour don’t send an email.
Frequently asked questions
Can a person on my team reply inside the chat widget?
No. The AI Chat Bot is AI-only. A handoff to a human means the shopper gets your support link, and you get the email summary if Send Email on Escalation is on. Your team then replies by email or through your support page.
Do I need a paid plan to collect feedback?
No. Customer feedback works on every StoreAgent plan. Support escalation and escalation emails need the Growth plan or higher.
Need help?
If you have a question or run into any issues, we’re here to help.
- Premium users: Open a support ticket
- Free users: Visit our community forum