
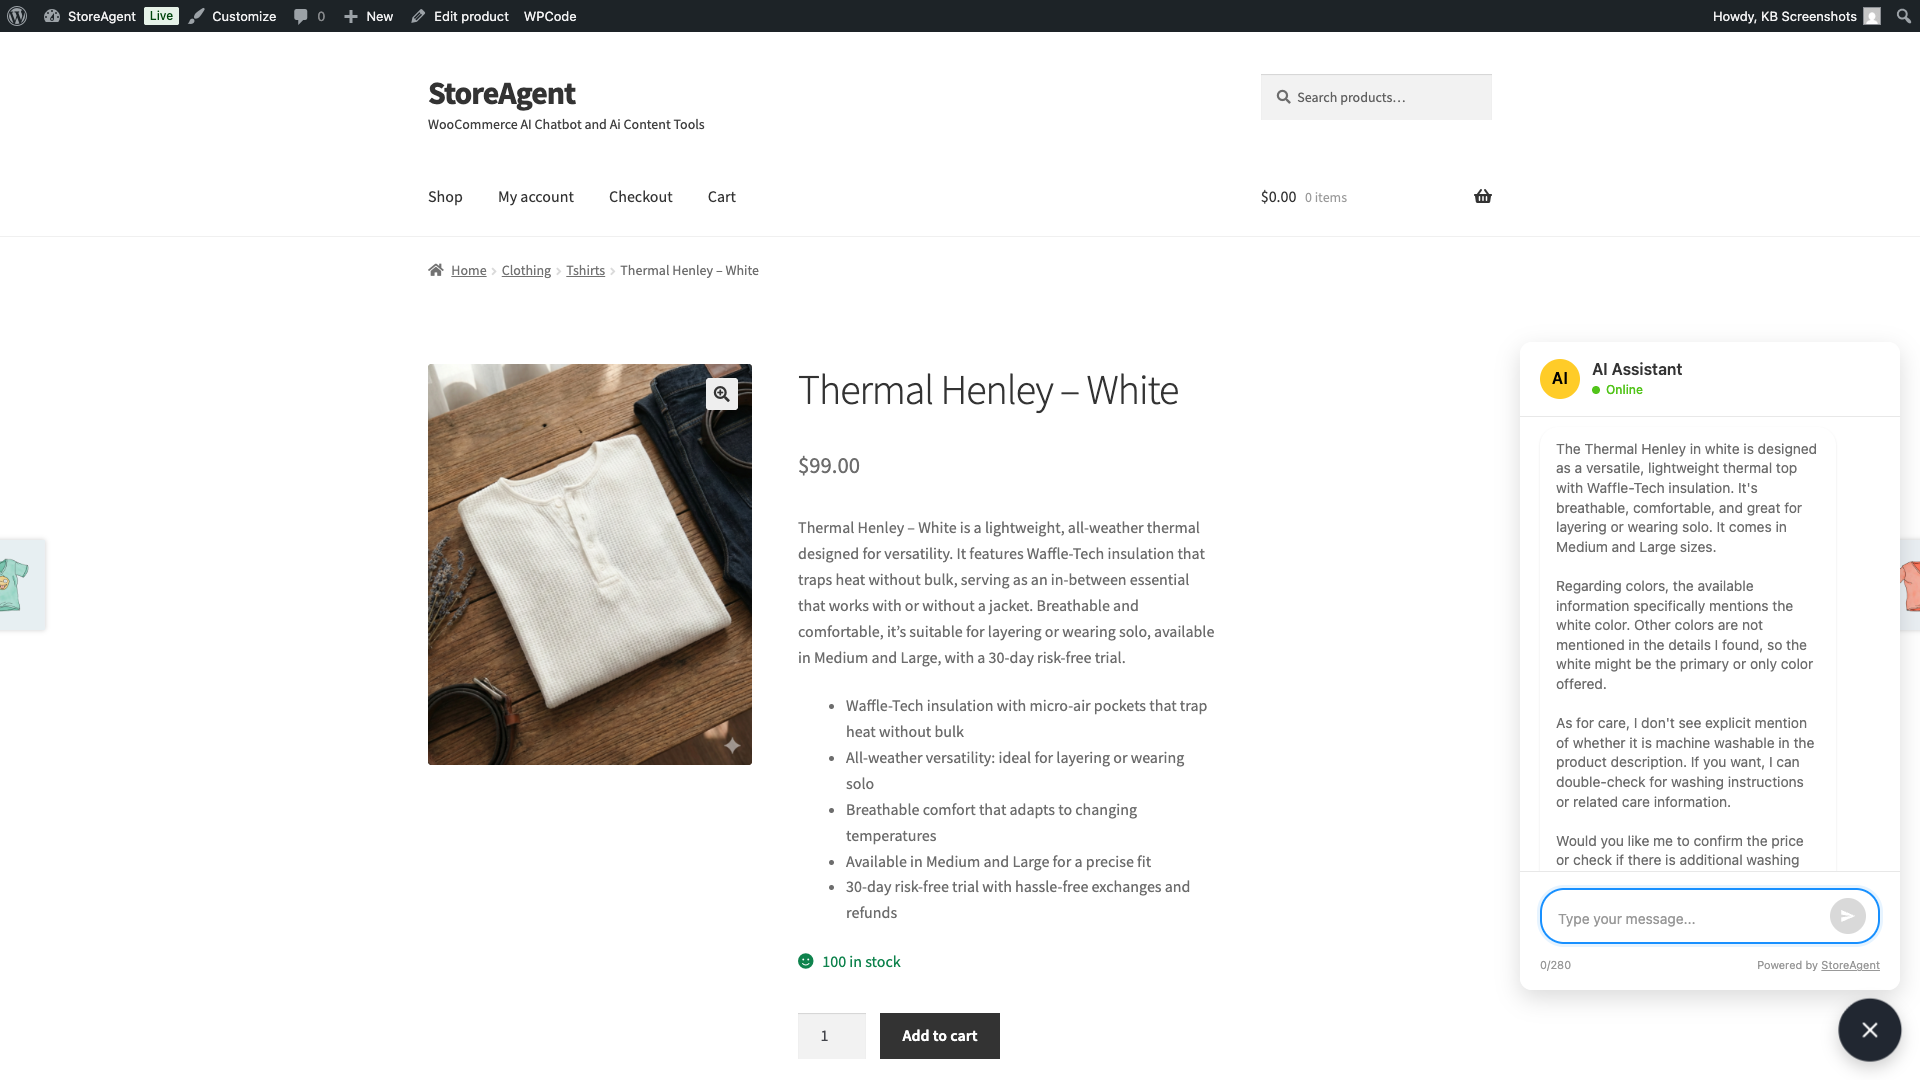
Shoppers ask questions at all hours, not only when your team is online. The StoreAgent AI Chat Bot answers them for you, using your product data, live prices and stock, and (for logged-in customers) their own orders. Once it’s enabled and your store content is indexed, the chat widget appears on your storefront and handles common questions on its own.
This guide shows you how to enable the chat widget, choose where it appears, protect shopper privacy, train it on extra knowledge beyond your product catalog, test it, and refine it using chat history. The richer and more accurate your store content, the more helpful the AI Chat Bot’s responses will be.
Requirements
- StoreAgent installed, activated, and connected to your StoreAgent account. See Getting started with StoreAgent.
- AI Memory turned on for Products on the Post Types sub-tab under StoreAgent → Settings → AI Chat.
- An administrator account. Only administrators can open StoreAgent settings.
What your AI Chat Bot can access
The AI Chat Bot draws on three sources of information during every conversation, so it can answer questions about your products, pricing, and orders in real time.
Your product catalog: synced to AI Memory and used as the chat’s primary knowledge base. The more complete your product descriptions, attributes, and FAQs are, the more accurate the responses will be. See How StoreAgent AI Memory works for the full reference.
Real-time prices and stock: the bot looks up current prices during the conversation, so customers always see accurate pricing even when prices change frequently. It also checks live stock, so it can say if an item is in stock, how many are left (if your store shows stock counts), and if backorders are allowed.
Order history: logged-in customers can ask about their own orders and get accurate answers directly in the chat. The bot can see the order status, items, totals, and the state and country of the billing and shipping addresses. It never receives a customer’s name, email, phone number, street address, city, postcode, or order notes. You can also turn order lookups off. See Protect shopper privacy below.
Guest shoppers who haven’t logged in can’t look up order data through the chat. Logged-in customers can only see their own orders.
Enable the chat widget
Set up the General tab
- In your WordPress dashboard, go to StoreAgent → Settings.
- Click the AI Chat tab. It opens on the General sub-tab.
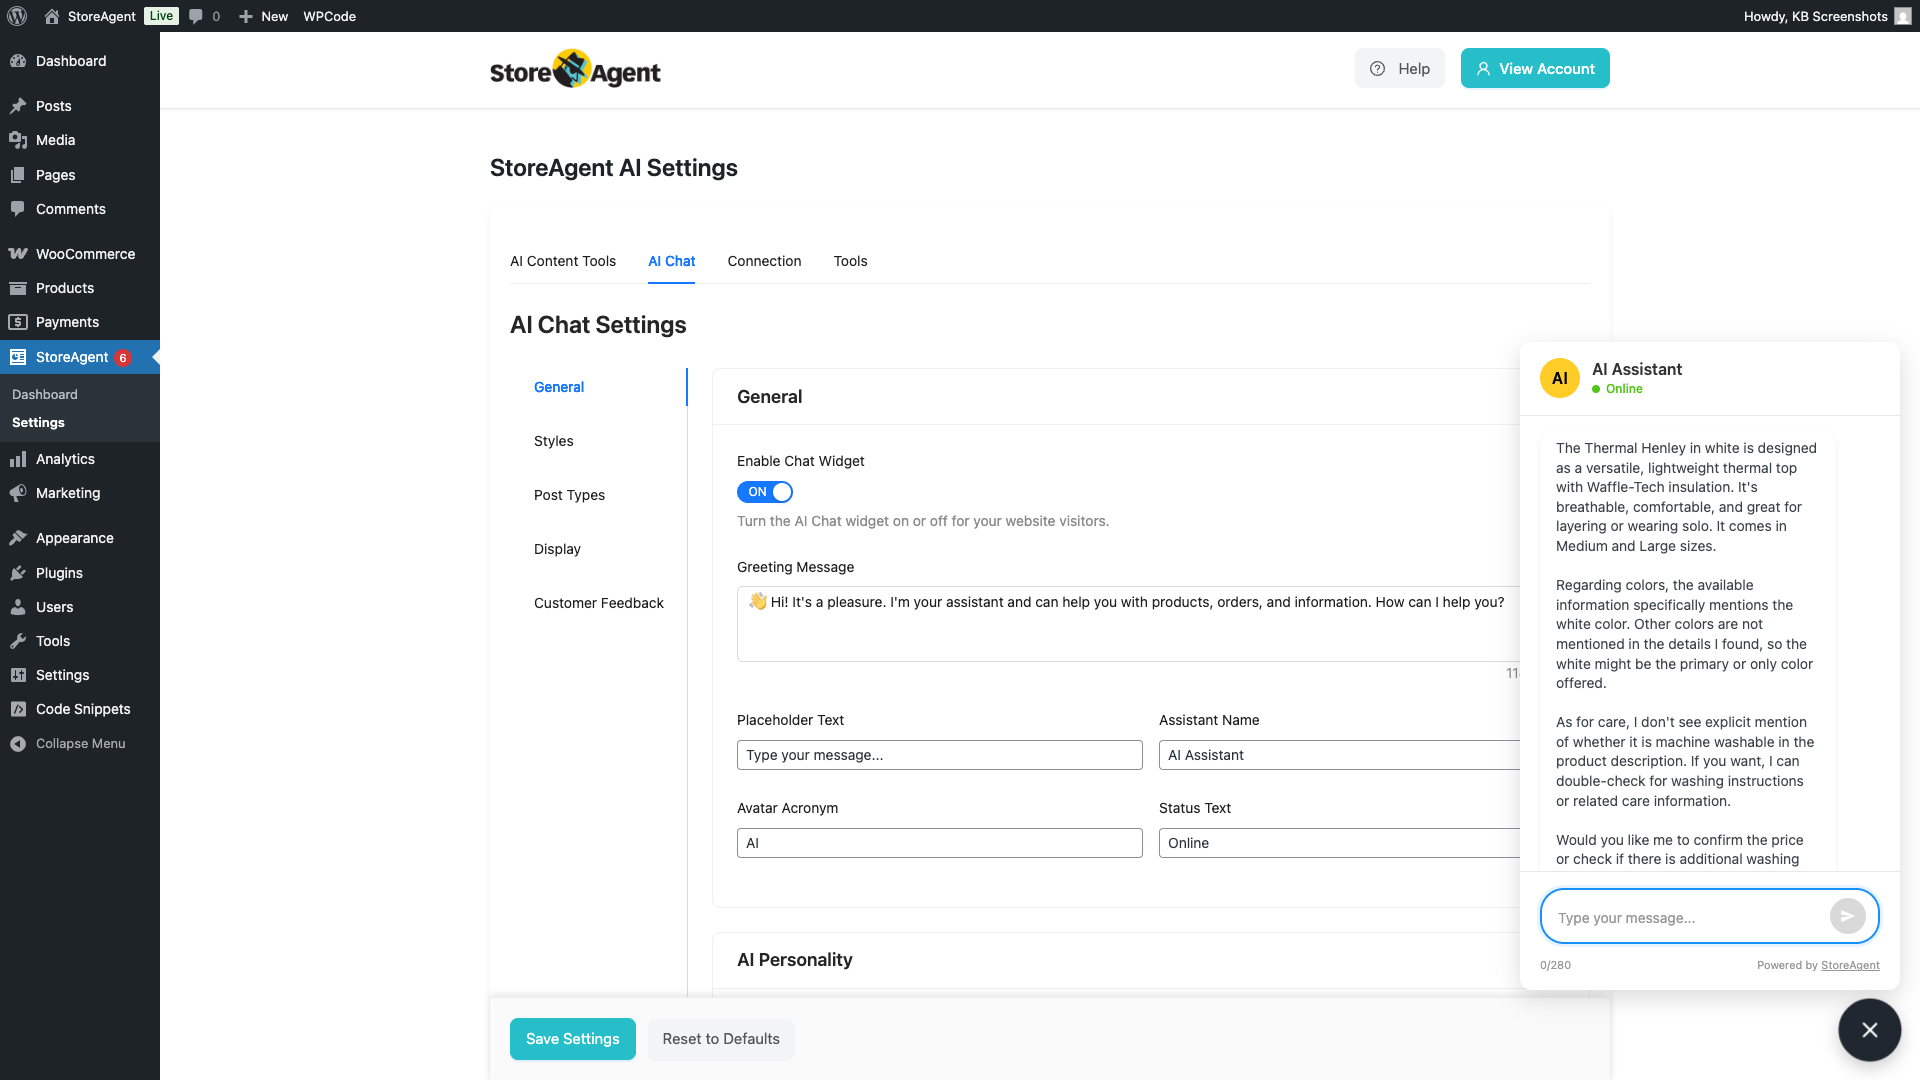
- Toggle Enable Chat Widget to ON.
- Enter a Greeting Message to welcome your customers when they open the chat.
- (Optional) Update Placeholder Text, Assistant Name, Avatar Acronym, and Status Text to match your brand voice.
- Scroll down and choose your Communication Tones (for example, Friendly, Conversational, or Informative).
- Click Save Settings.
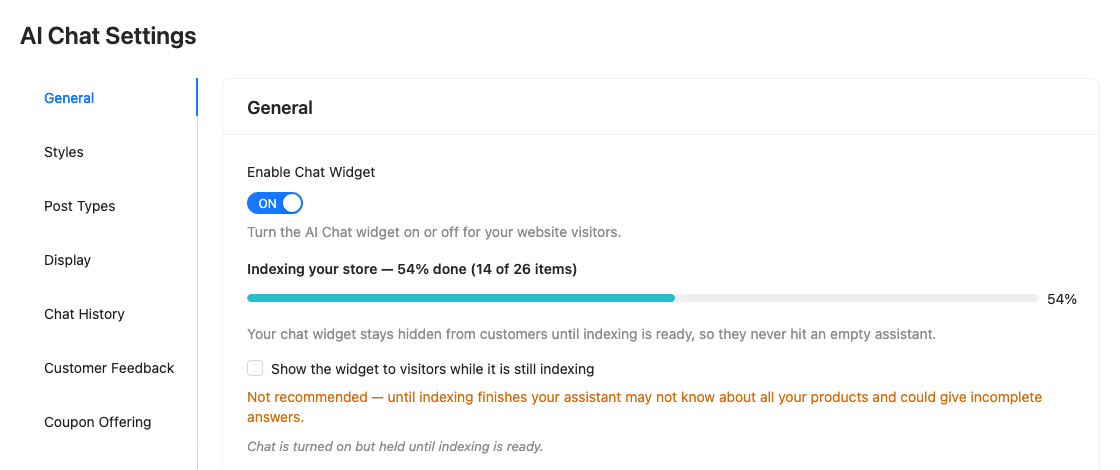
When you turn the widget on, StoreAgent keeps it hidden from shoppers until your store content is indexed, so nobody meets an assistant that knows nothing yet. Below the toggle you’ll see a progress bar. It starts with “Indexing your store” and shows the percentage done and the item count, for example “45% done (90 of 200 items)”.
- When most of your catalog is indexed, you’ll see Your AI Chat is ready and the widget goes live on your storefront.
- To show the widget sooner, tick Show the widget to visitors while it is still indexing. We don’t recommend it, because the bot may not know all your products yet and could give incomplete answers.
Set position and colors on the Styles tab
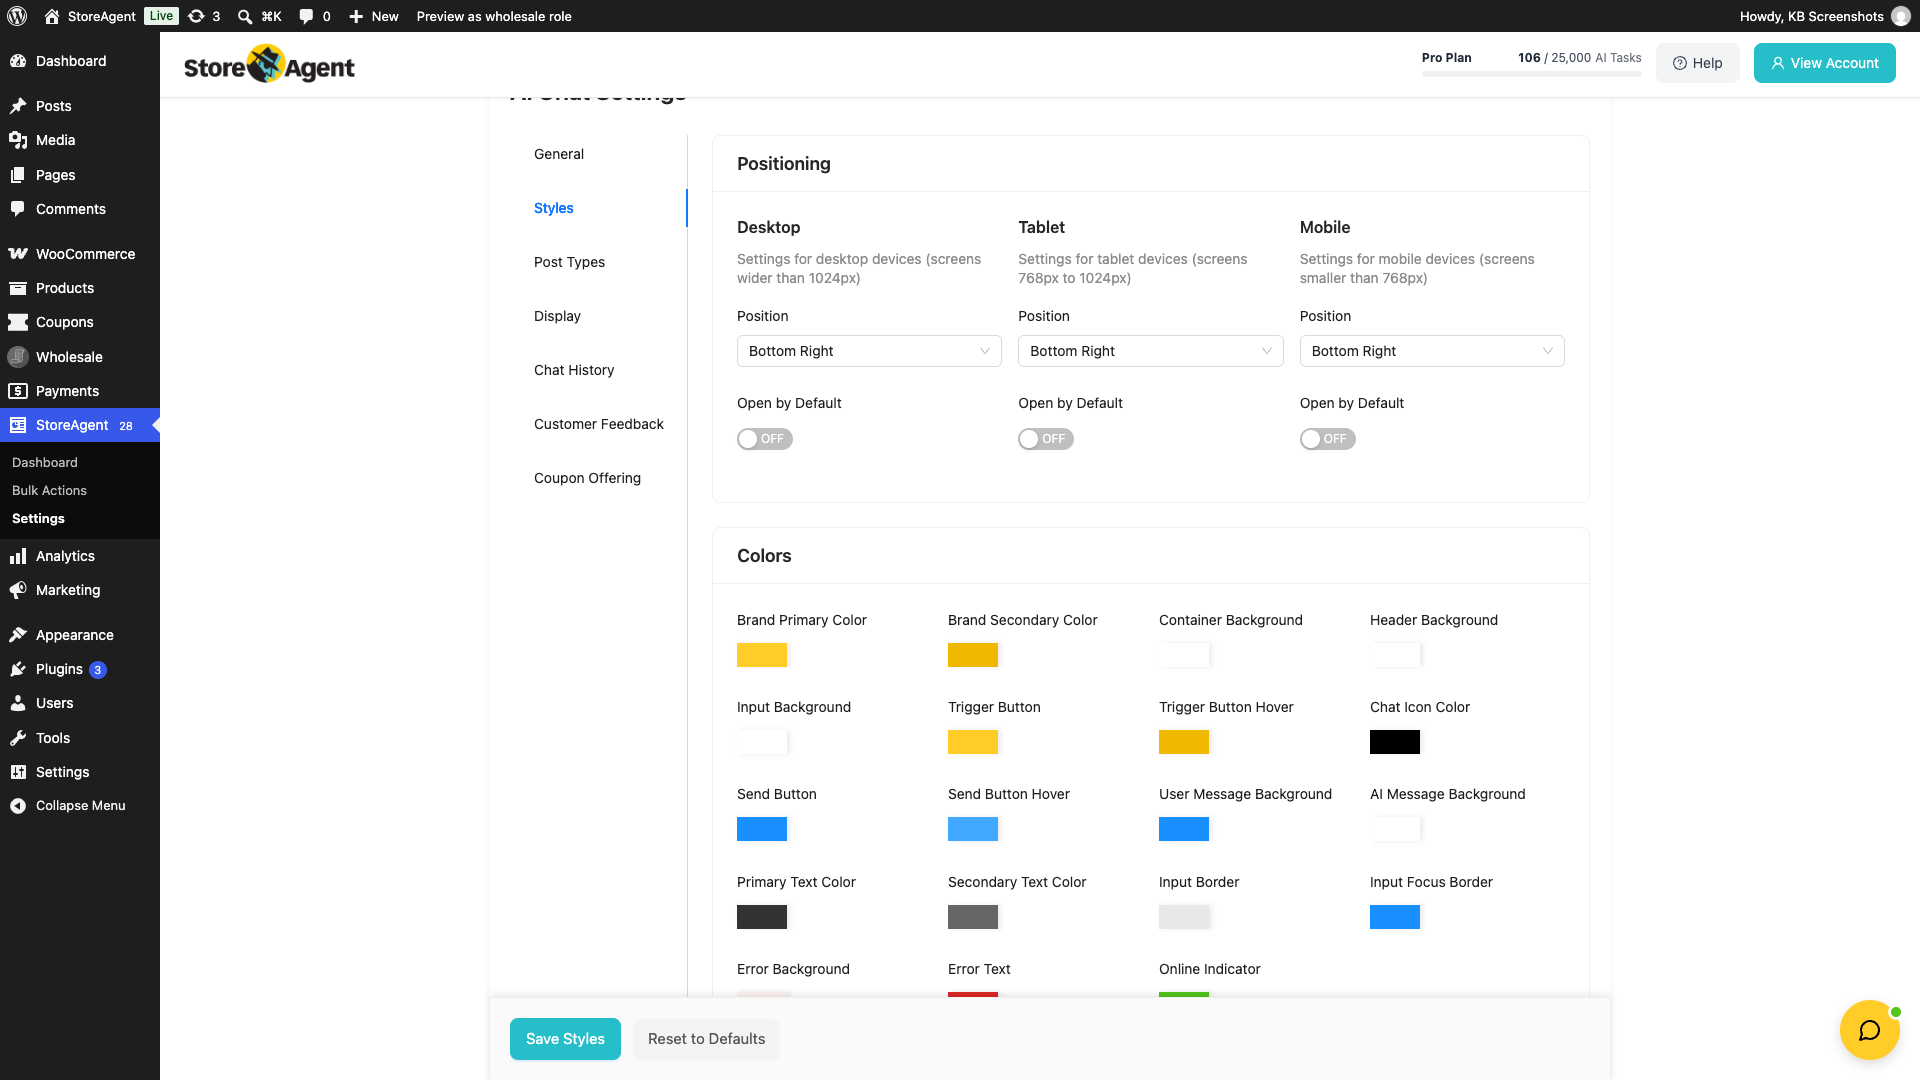
- Click the Styles sub-tab.
- Under Desktop, Tablet, and Mobile, choose a Position for each device (for example, Bottom Right).
- Customize the Colors section to match your store’s branding.
- Click Save Styles to apply your changes.
Control where the chat widget appears
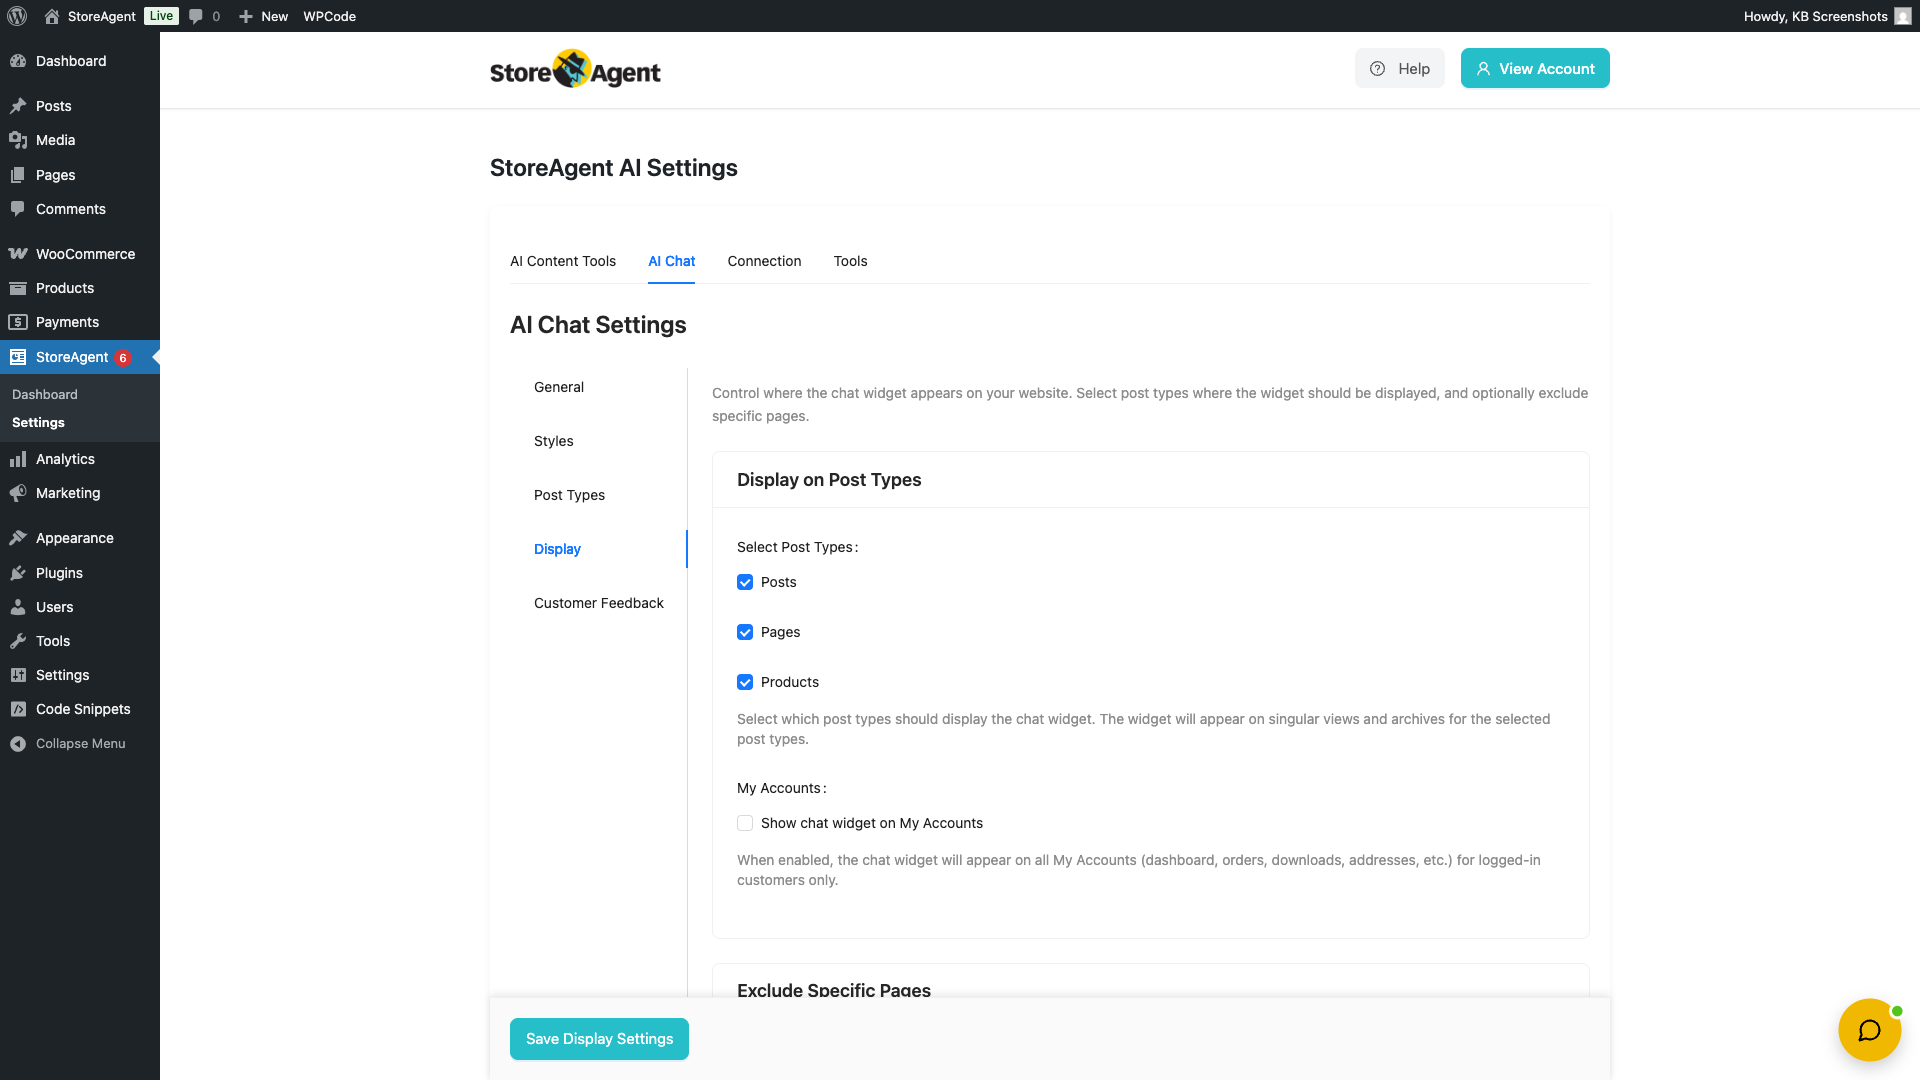
By default, the chat widget appears on WooCommerce product pages. You can expand or restrict where it shows using the Display sub-tab in the chat settings.
- Go to StoreAgent → Settings in your WordPress dashboard.
- Click the AI Chat tab, then click the Display sub-tab.
- Under Display on Post Types, use Select Post Types to choose each page type where you want the widget to appear, for example Products, Posts, or Pages.
- To show the widget on your WooCommerce My Account page, go to My Accounts and tick Show chat widget on My Accounts.
- To hide the widget on specific pages, go to Exclude Specific Pages and select them in the Excluded Pages field.
- Click Save Display Settings.
Protect shopper privacy
If you sell to shoppers in the EU or the UK, you may need to show how the chat handles personal data. StoreAgent gives you three tools for this: a switch for order lookups, suggested text for your privacy policy, and support for the WordPress personal data export and erase tools. These tools need StoreAgent 1.2.0 or later.
Choose whether the chat can look up orders
- Go to StoreAgent → Settings and click the AI Chat tab.
- On the General sub-tab, scroll down to the Privacy section.
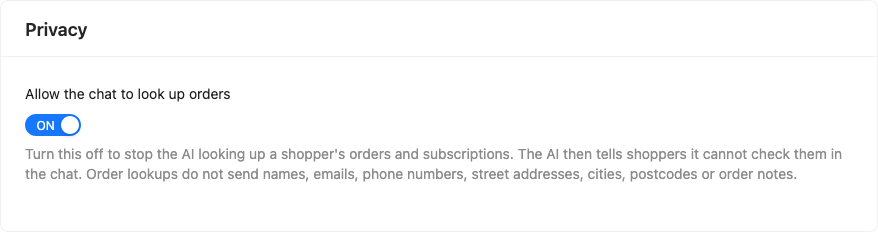
- Set Allow the chat to look up orders to ON or OFF.
- Click Save Settings.
- The switch is ON by default, and stays on when you update from an older version.
- When it’s OFF, the bot tells shoppers it can’t check their orders or subscriptions in the chat. It doesn’t tell them the order number is wrong.
- When it’s ON, order lookups still never send names, emails, phone numbers, street addresses, cities, postcodes, or order notes.
- Product questions, prices, stock, and knowledge answers work the same either way.
Add the chat to your privacy policy
When the chat widget is enabled, StoreAgent adds suggested text to the WordPress privacy policy guide.
- In your WordPress dashboard, go to Settings → Privacy.
- Click the Policy Guide tab.
- Find the StoreAgent AI for WooCommerce section.
- Click Copy suggested policy text to clipboard, paste the text into your privacy policy page, then edit it to match how your store works.
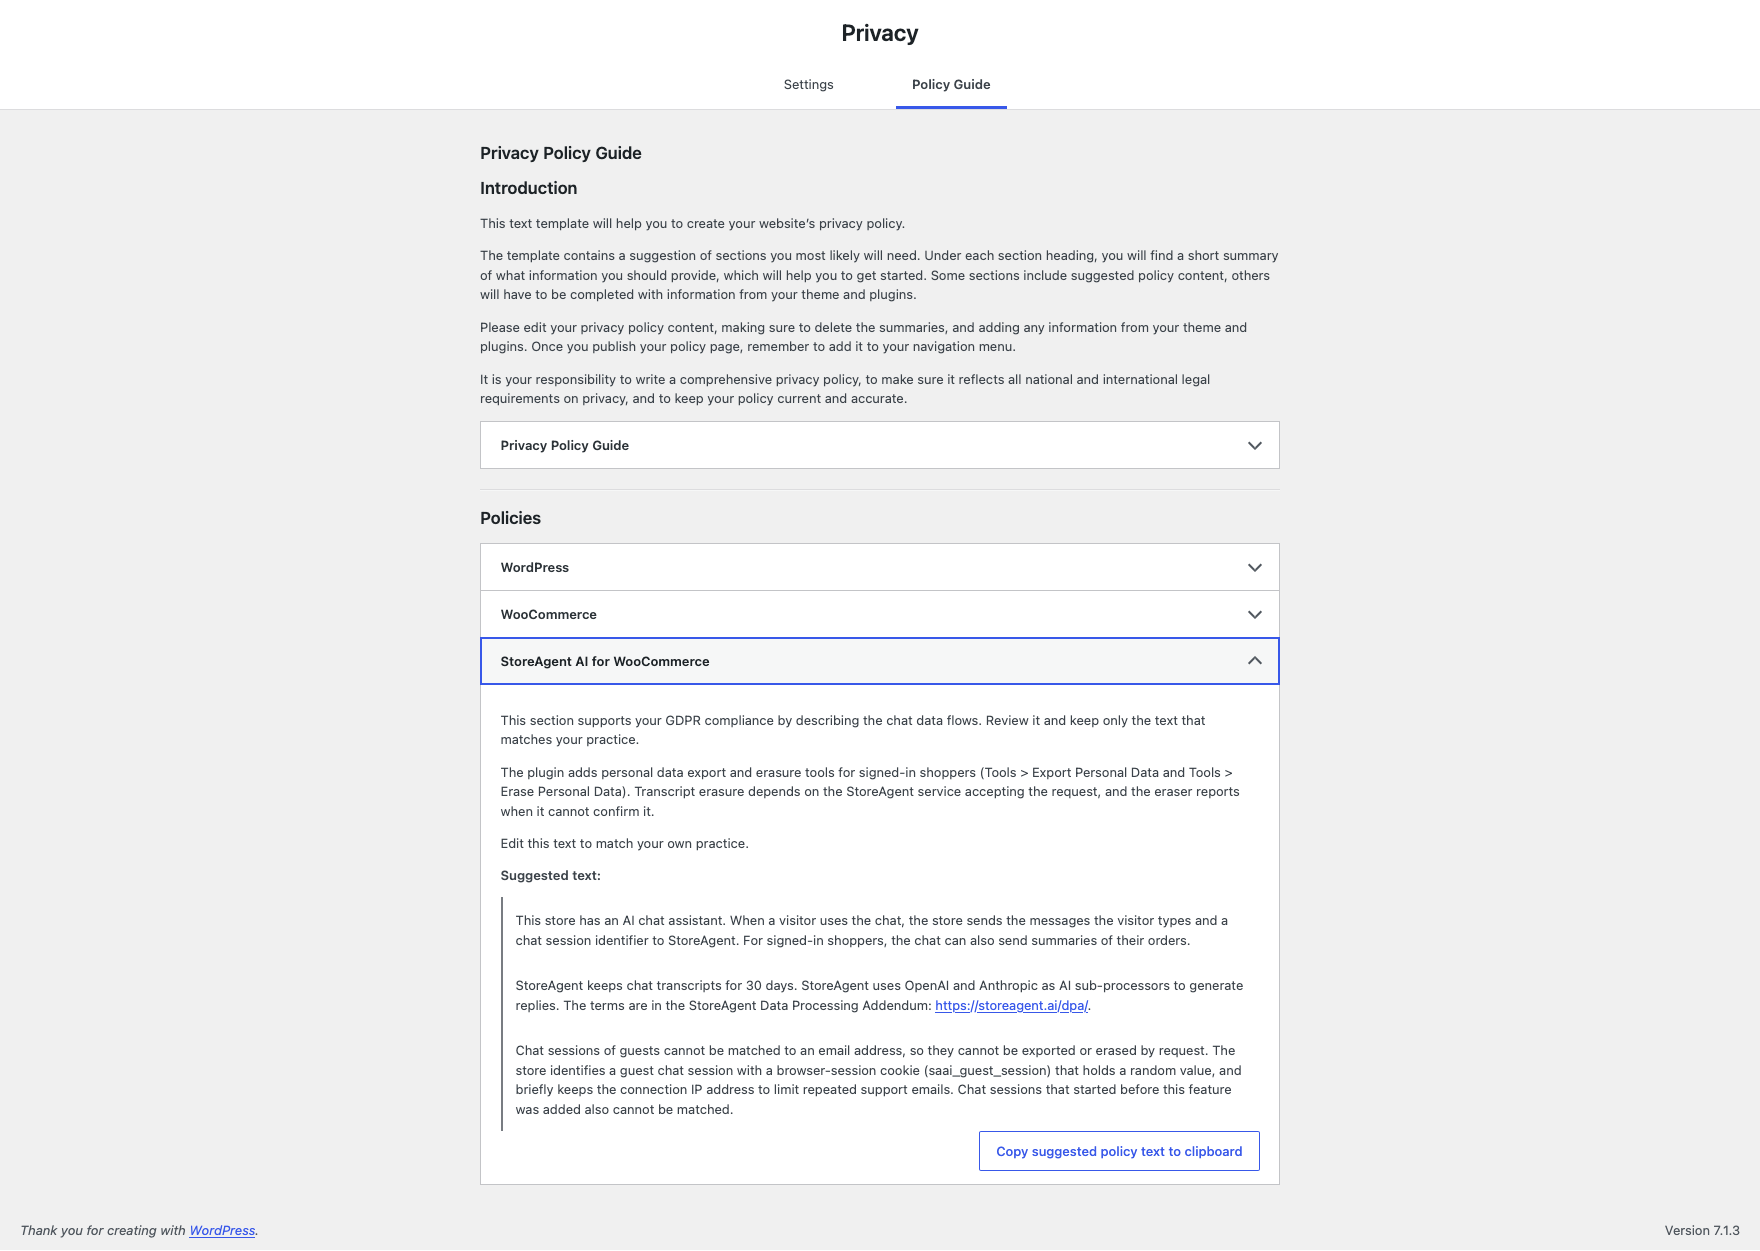
The suggested text tells shoppers that the chat sends their messages and a chat session identifier to StoreAgent, plus order summaries for logged-in shoppers. It also says StoreAgent keeps chat transcripts for 30 days, names OpenAI and Anthropic as the AI sub-processors, and links to the StoreAgent Data Processing Addendum.
If the StoreAgent section isn’t there, check that Enable Chat Widget is ON on the General sub-tab.
Export a customer’s chat transcripts
When a logged-in customer asks for a copy of their data, the WordPress Export Personal Data tool includes their StoreAgent chat transcripts.
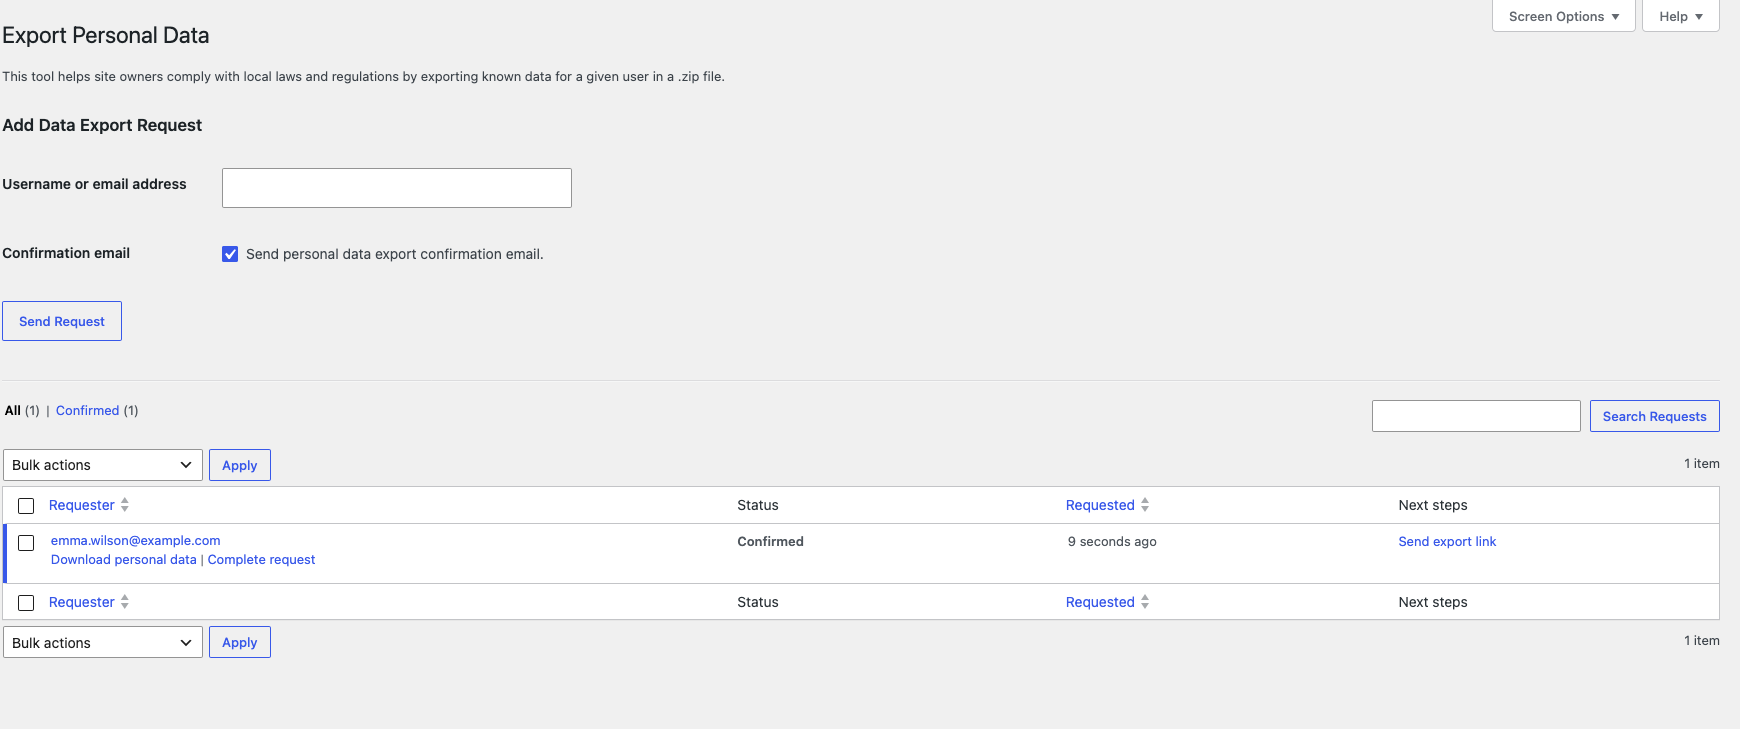
- Go to Tools → Export Personal Data.
- Enter the customer’s email address in Username or email address.
- Click Send Request.
- After the customer confirms the request, click Download personal data next to it.
The download includes a StoreAgent Chat group with one entry per message, showing the Session, Date, Sender, and Message.
If you clear the Send personal data export confirmation email checkbox before you click Send Request, WordPress marks the request as confirmed at once, so you can skip waiting for the customer.
Erase a customer’s chat transcripts
When a logged-in customer asks you to delete their data, the WordPress Erase Personal Data tool also deletes their StoreAgent chat transcripts.
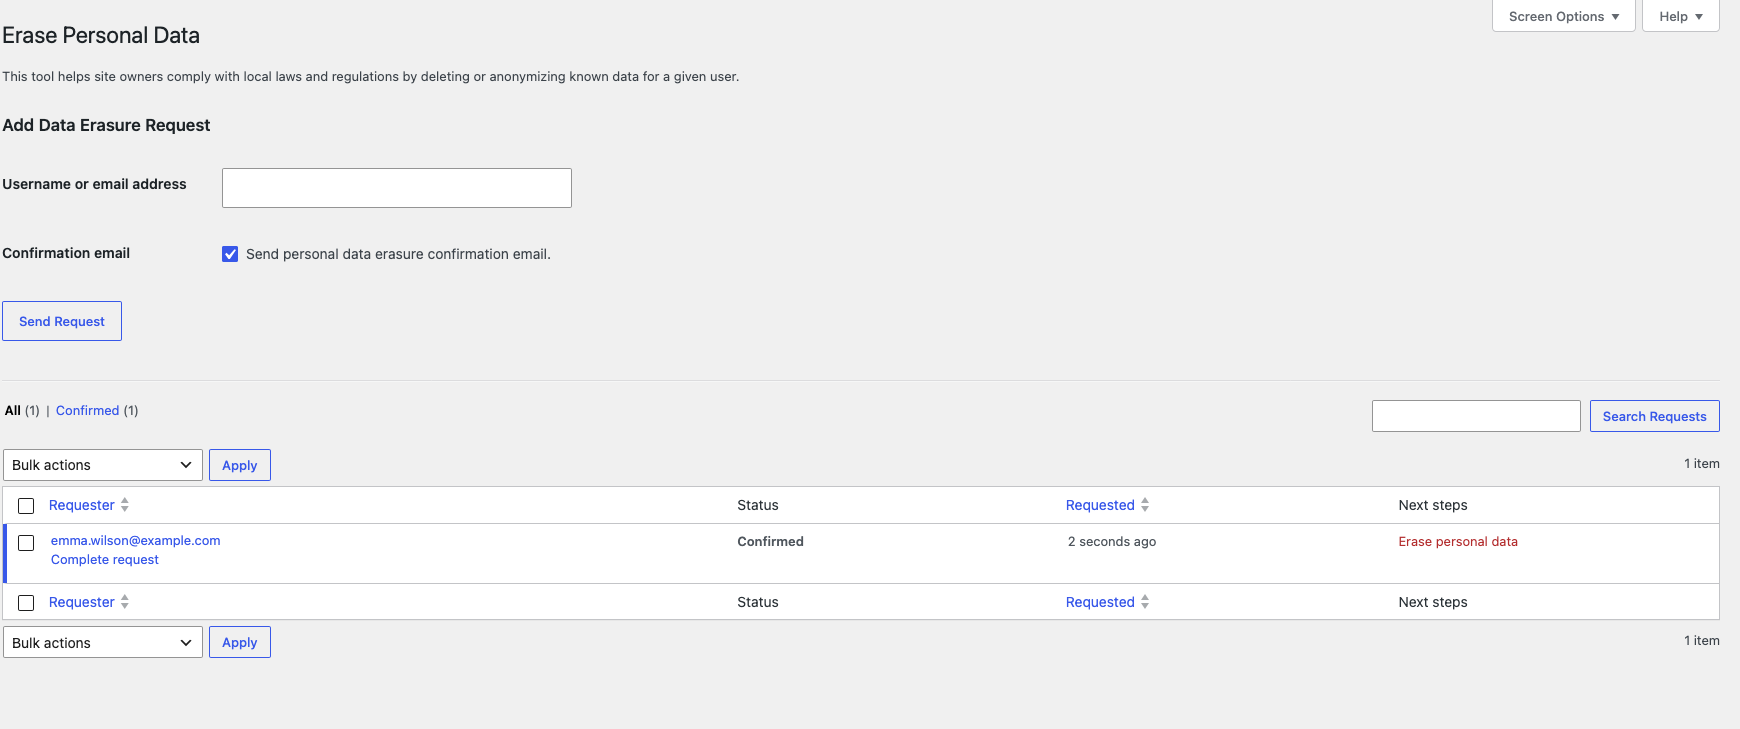
- Go to Tools → Erase Personal Data.
- Enter the customer’s email address in Username or email address.
- Click Send Request.
- After the customer confirms the request, click Erase personal data next to it.
- The plugin removes the chat session links stored on your site, then asks the StoreAgent service to delete the customer’s chat transcripts.
- If StoreAgent can’t confirm the deletion, for example because your store isn’t connected, WordPress shows a message. The plugin keeps those sessions on file so you can run the erase again.
If you clear the Send personal data erasure confirmation email checkbox before you click Send Request, WordPress marks the request as confirmed at once, so you can skip waiting for the customer.
Both tools find chats from logged-in customers only, matched by the email address on their account. Guest chats can’t be matched to an email address, so they can’t be exported or erased by request. Chats that started before StoreAgent 1.2.0 can’t be matched either.
How guest chats are identified: StoreAgent identifies a guest’s chat with a random value in a browser-session cookie called saai_guest_session, not with the visitor’s IP address or browser details. It keeps the visitor’s connection IP address for a short time, only to limit repeated support emails.
Train the AI Chat Bot on extra knowledge
Out of the box, the AI Chat Bot knows about your product catalog and store pages. For topics that don’t live on a product page, such as shipping rules, return policies, store hours, and common FAQs, add extra knowledge in your StoreAgent account at app.storeagent.ai:
- AI Chat Documents: upload policies, FAQs, guides, and spec sheets for the bot to answer from. Go to My Account → AI Chat Documents. See How to use AI Chat Documents in StoreAgent.
- AI Custom Instructions: write the store rules the bot follows in every chat, such as where to send billing questions or when to hand over to a human. Go to My Account → AI Custom Instructions. See How to use AI Custom Instructions in StoreAgent.
Both are paid-plan features and are not available on the free StoreAgent Lite plan. View the pricing page to compare plans.
Test what the bot knows after adding new knowledge
After uploading a document, changing your instructions, or updating product content, give the bot a few minutes to index the changes, then test by asking it the questions you expect customers to ask. If it doesn’t pick up the new content, see Troubleshooting below.
Test your AI Chat Bot
Before going live, test how the AI Chat Bot responds to your customers. There are two ways to do this.
Test from the settings page
When you’re on the StoreAgent → Settings → AI Chat page, a live version of the chat widget appears in the corner of your screen. You can open it and ask questions just as a customer would, without leaving the admin. This is the quickest way to verify your configuration after making changes. The preview also works while your store is still indexing, so you can test before the widget goes live for shoppers.
Test from your store’s frontend
- Visit your store’s frontend in a new browser tab.
- Navigate to a page where the widget is enabled (based on your Display settings).
- Click the chat widget to open it.
- Type a question about one of your products (e.g., “Does this shirt come in large?”).
- Confirm the AI responds with accurate information from your store.
- Test a few different questions to ensure your product data is providing helpful answers.
💡 Tip: If an answer isn’t complete, review the related product page and add more details. The AI Chat Bot learns directly from your product content.
Read the AI Memory column
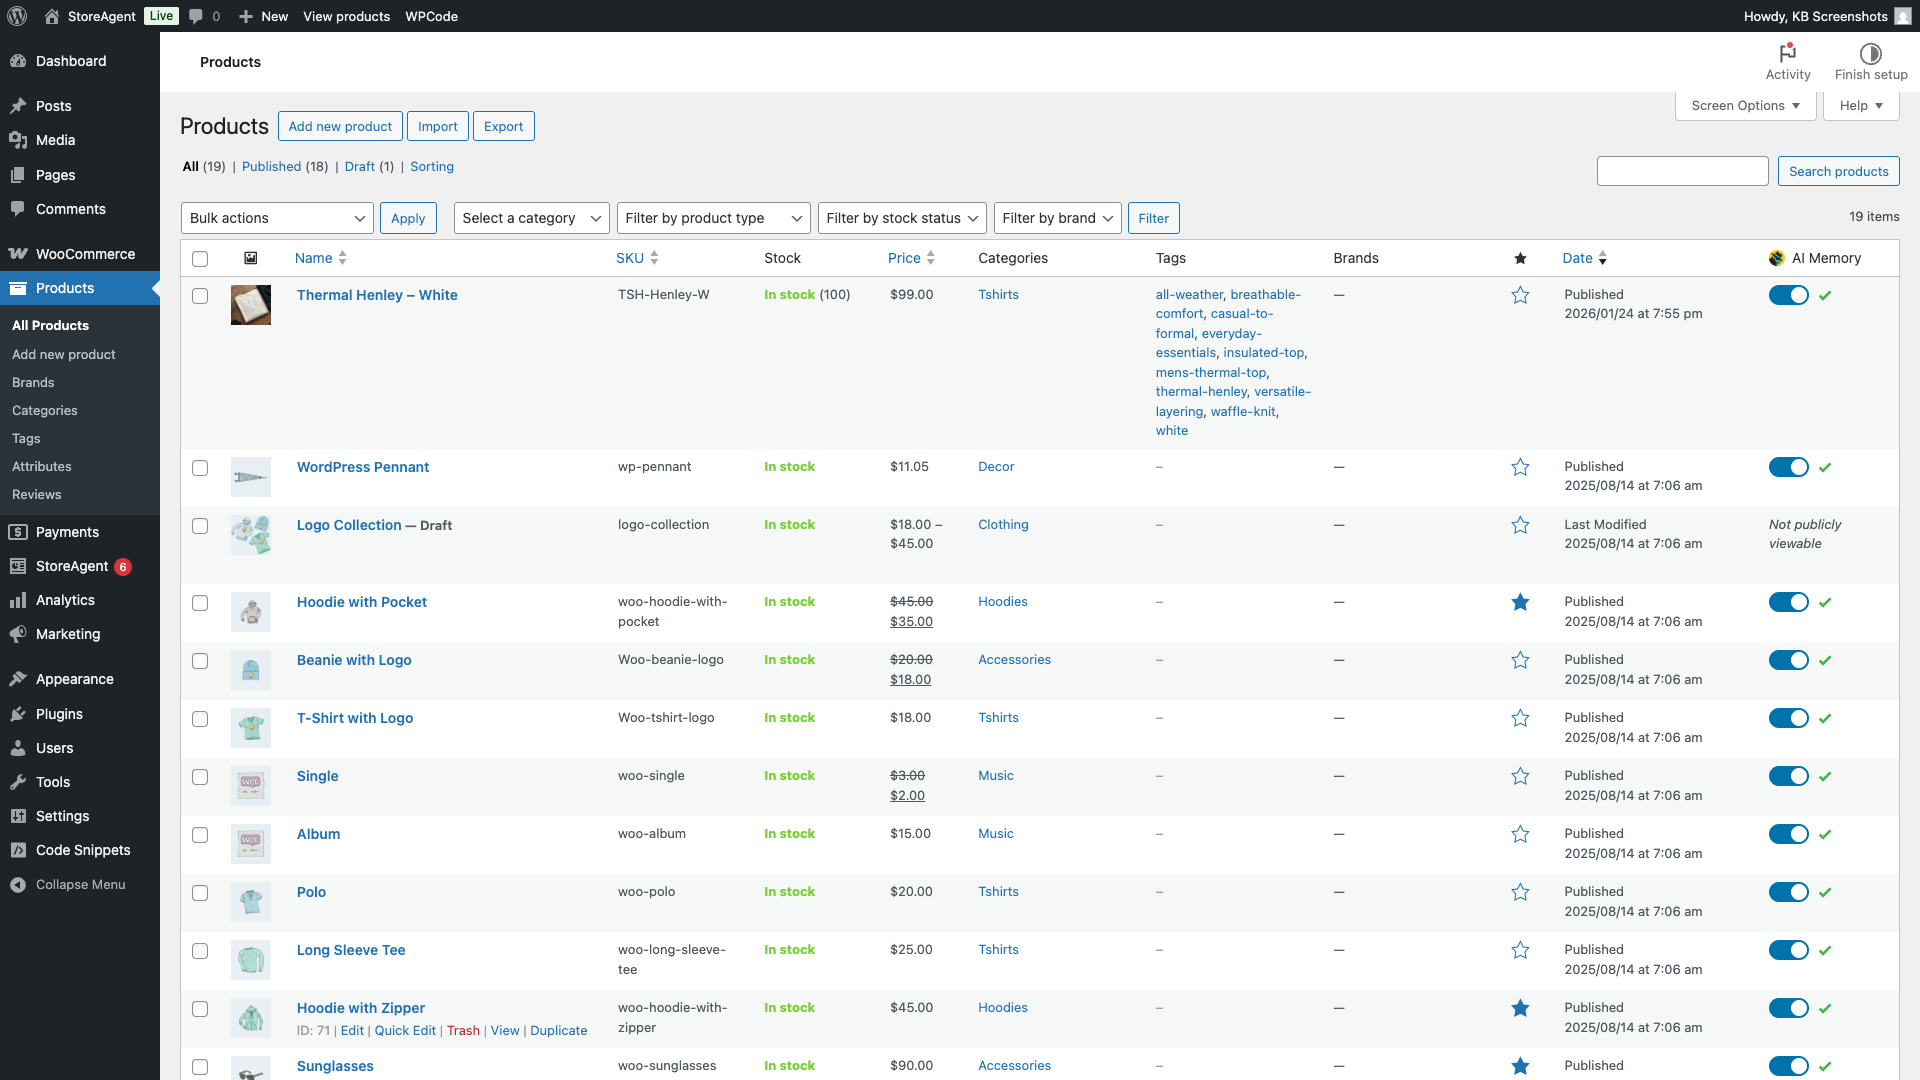
The AI Memory column appears in your WooCommerce Products list (and in any other post type lists you’ve enabled for AI Memory). It shows the sync status for each item and lets you control what data the chat can access.
Status icons
| Icon | Meaning |
|---|---|
| ✅ Green checkmark | Synced: the product is in AI Memory and up to date |
| 🔵 Blue dots | Pending upload: AI Memory is enabled but the data hasn’t synced yet |
| ⚠️ Amber warning | Upload failed: the last upload to AI Memory failed. Hover over the icon to see the error, then click the sync icon (Sync Now) next to the post type on StoreAgent → Settings → AI Chat → Post Types to retry it |
| 🟢 Green dots | Update pending: the product data has changed since the last sync and needs re-uploading |
| 🔴 Red dots | Pending removal: AI Memory is being disabled for this product |
Hover over any icon to see more detail, including when the last sync was completed or when the next one is scheduled.
Manage AI Memory per product
Each row has a toggle you can use to enable or disable AI Memory for that product individually. Disabling a product removes it from the chat’s knowledge base on the next sync.
To update multiple products at once, select them using the checkboxes, then choose an option from the Bulk Actions dropdown:
- Add to AI Memory: enables AI Memory and schedules a sync for the selected products
- Remove from AI Memory: disables AI Memory and schedules removal for the selected products
Changes are processed in the background. The status icon updates once the sync or removal is complete.
Review customer chat history
Monitoring past chats helps you understand customer needs, improve responses, and identify gaps in your product information. StoreAgent keeps your customer conversations for 30 days, so you can review recent chats.
Chat history is available on the Pro and Business plans. See the pricing page to compare plans.
To review chat history:
- Click View Account in the StoreAgent header in your WordPress admin, or log in to your StoreAgent account directly.
- From the left menu, click Chat History.
- Use the Start date and End date fields to filter conversations, or click Clear Filters to view all sessions.
- Click a Session ID to open and review the full conversation.
- Note common customer questions and use these insights to improve your product descriptions or FAQs.
Improve chat results with product data updates
The AI Chat Bot’s accuracy depends on how detailed and relevant your WooCommerce product data is. By regularly reviewing chat history, you can identify where the AI might have struggled or given incomplete responses, and improve those areas.
Refine your chat results
- Identify unclear or incorrect answers in your chat history. Look for questions where the bot provided vague or missing details.
- Locate the related product(s) in your WooCommerce dashboard. Edit the product and review its title, description, attributes, and FAQs.
- Add or refine product details to make information clearer. Include sizing details, materials, variations, compatibility, or usage notes.
- Save your changes. The AI picks up your updated product data on the next sync and uses it in future conversations.
- Retest the question in your store’s frontend chat widget to confirm the improved response.
💡 Pro tip: Regularly reviewing chat sessions helps you spot trends, such as frequently asked questions or missing product details, so you can continuously enhance your store content and make the AI Chat Bot smarter over time.
Troubleshooting
The bot says “I checked the knowledge base but couldn’t find information”
This usually means the product hasn’t been synced to AI Memory yet, or the sync is out of date. To fix it:
- Confirm the product is Published in WooCommerce. Only published products are indexed in AI Memory. Products hidden from the catalog or protected by a password are not indexed either, and the AI Memory column shows Hidden from catalog or Not publicly viewable for them.
- Go to Products → All Products and check the AI Memory column for that product (see Read the AI Memory column above).
- If the status shows pending upload (blue dots) or pending update (green dots), the sync is already scheduled. Wait a few minutes and retest.
- If AI Memory is disabled for the product (toggle is off), select it using the checkbox, choose Add to AI Memory from the Bulk Actions dropdown, and click Apply. The sync runs in the background.
- If you see Indexing needs attention on StoreAgent → Settings → AI Chat → General, wait a couple of minutes, then click Resume indexing if it’s still there.
- If the sync stays stuck for more than 15 minutes, go to StoreAgent → Settings, open the Tools tab, and under Clear Post Data Hashes click Clear Post Hashes, then Yes, Clear Hashes.
- This sends all your content to AI Memory again.
- The chat widget stays hidden until indexing is ready.
- You can run this tool once an hour. Use it as a last resort.
The chat widget doesn’t show on my store yet
Go to StoreAgent → Settings → AI Chat → General and check the message below Enable Chat Widget:
- “Chat is turned on but held until indexing is ready.” means StoreAgent is still indexing your store. Wait for the progress bar to finish.
- Indexing needs attention means the sync paused. Wait a couple of minutes, because it usually restarts by itself. If it doesn’t, click Resume indexing.
- No message? Check the Display sub-tab to make sure the widget is set to show on that page type, and that the page isn’t in Excluded Pages.
If indexing won’t move, see Troubleshooting StoreAgent product sync stuck at 0.
The bot says it can’t look up orders
Go to StoreAgent → Settings → AI Chat → General and check that Allow the chat to look up orders in the Privacy section is ON. When it’s OFF, the bot tells every shopper it can’t check orders in the chat.
If the switch is already on, ask the customer to log in. The bot can’t look up orders for guest shoppers, and it only shows logged-in customers their own orders.
The bot can’t answer policy questions (shipping, returns, store hours)
Those topics live outside your product catalog, so AI Memory alone doesn’t cover them. Add them with AI Chat Documents or AI Custom Instructions in your StoreAgent account. See Train the AI Chat Bot on extra knowledge above.
I can’t find AI Chat Documents or AI Custom Instructions
Both live in your StoreAgent account, not in the WordPress plugin. Log in at app.storeagent.ai and look under My Account. They are paid-plan features and aren’t included on the free StoreAgent Lite plan. Check the pricing page to compare plans, or sign in to your StoreAgent account to see your current plan.
What’s next
Now that your chat widget is set up, explore these related articles to get the most out of the AI Chat Bot:
- How StoreAgent AI Memory works: learn how StoreAgent indexes your products and keeps the AI Chat Bot up to date
- How to set up chat feedback and escalation in StoreAgent: set up feedback collection and human escalation so customers can rate responses and reach your team when needed
Frequently asked questions
Can the AI Chat Bot answer questions outside my product catalog?
Yes. On a paid plan, upload documents with AI Chat Documents or add store rules with AI Custom Instructions, for topics like shipping, returns, store policies, and FAQs that don’t live on a product page. See Train the AI Chat Bot on extra knowledge above.
Can logged-in customers look up their order history in the chat?
Yes, as long as Allow the chat to look up orders is on, which it is by default. When a logged-in customer asks about an order, the AI Chat Bot can look up the order status, items, totals, and the state and country of the billing and shipping addresses in real time. Guest shoppers can’t access order data through the chat.
Can I delete a customer’s chat history when they ask?
Yes, for logged-in customers. Run Tools → Erase Personal Data with the email address on their account. Guest chats can’t be matched to an email address, so they can’t be erased by request. See Protect shopper privacy above.
Does turning off order lookups affect product questions?
No. The switch only stops order and subscription lookups. The bot still answers questions about your products, prices, stock, and store knowledge.
How long does it take for new product data to appear in chat responses?
Updates to your products and pages are queued for sync as soon as you save them. Most syncs complete within a few minutes. Watch the AI Memory column on your Products list to confirm the sync has finished. Once the icon changes to a green checkmark, the chat is using the latest version.
Need help?
If you have a question or run into any issues, we’re here to help.
- Premium users: Open a support ticket
- Free users: Visit our community forum