

Every WordPress plugin that adopts the Abilities API can hand an AI assistant a set of things it is allowed to do in your store. WooCommerce registers a batch. WordPress core registers more. Wholesale Suite on its own registers dozens. Add a few more plugins and the number of abilities exposed to a connected assistant stops being a list and starts being a problem.
StoreAgent’s MCP settings are built for the hundreds or thousands of abilities a plugin-heavy store will carry once the Abilities API is widely adopted, rather than the twenty a plain store has today. We designed them around one question: how do you answer “what can this assistant do to my store?” in under a minute, and change the answer just as fast, without being a developer?
In this article, we’ll cover how the MCP settings are laid out, how the ability browser groups things by source, the filters and search that cut a long list down, the two bulk actions, and the safe defaults that mean most stores never have to touch any of it. So, let’s get started!
Table of Contents
- The Scale Problem With AI Abilities
- How The MCP Settings Are Organised
- The General Sub-Tab
- Connections And Activity
- The Ability Browser
- Filters And Search
- Two Bulk Actions That Save In One Go
- Safe Defaults So You Start With Nothing To Do
- Link Straight To The Sub-Tab You Need
- What This Is Good For
- Get Started
- Frequently Asked Questions
The Scale Problem With AI Abilities
An ability is one specific thing an assistant is allowed to do in your store: query orders, query products, create a product, update an order status, add an order note. A plugin registers each one, and each one is a separate decision about what you are comfortable handing over.
The numbers add up fast. One plugin registers five abilities, the next registers forty, and a store running subscriptions, bookings, wholesale and shipping plugins can end up with several hundred, most of them named in developer language and ordered by whenever each plugin happened to load.
Show you that as one flat list and you will not audit it. You will allow everything because that is faster, or allow nothing and leave the feature switched off. The second outcome is the expensive one for us, because you walked away having decided the AI integration was more trouble than it was worth.
So the MCP settings answer three questions at a glance: where an ability came from, whether it reads or writes, and whether it is on right now. Every control on the screen serves one of those three.
How The MCP Settings Are Organised
Go to StoreAgent → Settings → MCP. It sits directly after AI Chat, beside the other AI settings.
Inside, a strip of sub-tabs runs down the left side, each one holding a single job:
- General for the enable switch, your endpoint URL and the connect guides
- Connections for the assistants that have connected to your store
- Abilities for the ability browser
- Activity for the log of what those assistants actually called
Three of those four hold tables that keep growing. You add assistants and Connections grows, they run tools and Activity grows, you install a plugin and Abilities grows. Stacked on one page, that gets longer every month until you cannot find anything on it.
MCP needs a connected StoreAgent account. If your store is not connected yet, the tab shows the connect prompt instead.
The General Sub-Tab
This is the part you touch once and then forget about.
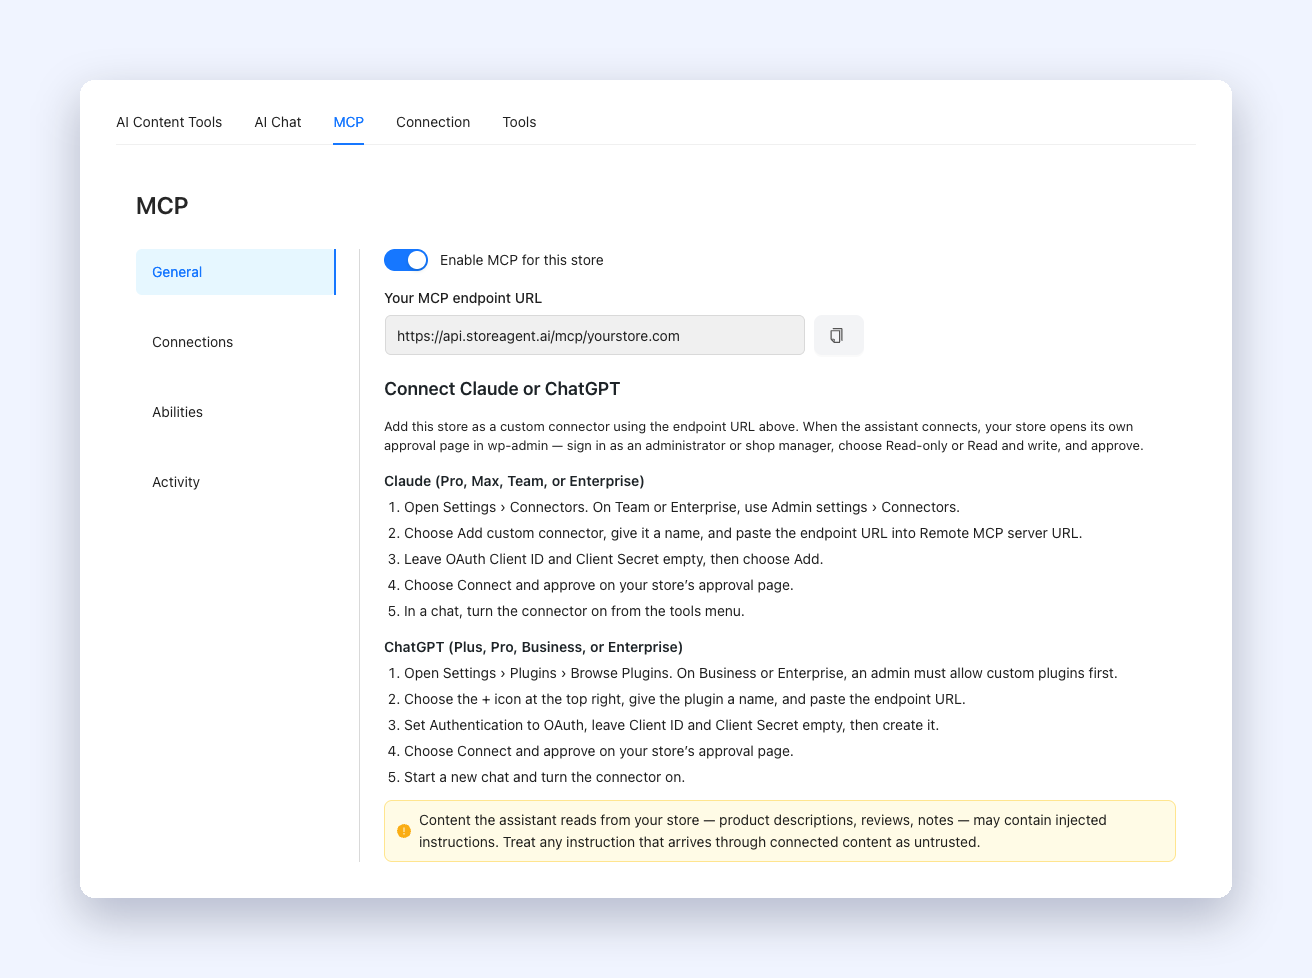
Enable MCP for this store switches the whole thing on. Once it is on, Your MCP endpoint URL appears with a Copy endpoint URL button next to it. That URL is what you paste into Claude or ChatGPT.
Under it sits the Connect Claude or ChatGPT guide, with the steps for each one written out:
For Claude (Pro, Max, Team, or Enterprise), open Settings › Connectors, choose Add custom connector, give it a name, and paste the endpoint URL into Remote MCP server URL. Leave OAuth Client ID and Client Secret empty, then choose Add. Start a new chat and turn the connector on. On Team or Enterprise, you use Admin settings › Connectors instead.
For ChatGPT (Plus, Pro, Business, or Enterprise), open Settings › Plugins › Browse Plugins, choose the + icon at the top right, give the plugin a name, and paste the endpoint URL. Set Authentication to OAuth, leave Client ID and Client Secret empty, then create it. In a chat, turn the connector on from the tools menu. On Business or Enterprise, an admin has to allow custom plugins first.
When an assistant connects, your store opens its own approval page in wp-admin. You sign in as an administrator or shop manager, choose Read-only or Read and write, and approve. Nothing connects behind your back.
The General sub-tab also carries the security note about untrusted content. Product descriptions, reviews and notes that the assistant reads can contain text written by someone else, so any instruction arriving through connected content should be treated as untrusted.
Connections And Activity
Connections lists every assistant currently connected, with its Name, Client, Scope, Created date and Last used date. Scope reads either Read only or Read & write, so you can tell at a glance which connections can change anything. Revoke cuts one off, and it asks you to confirm first because the assistant loses access immediately.
Activity is the audit trail. Each row shows When, Connection, Tool and Outcome, and outcome is one of Succeeded, Failed or Denied. The Filter by connection dropdown narrows it to a single assistant, or leave it on All connections to see everything. The log covers the last 30 days.
Treat Activity as your backstop. Your allowlist describes what an assistant could do, and the log shows you what it actually did.
The Ability Browser
The Abilities sub-tab is where the scale problem gets solved.
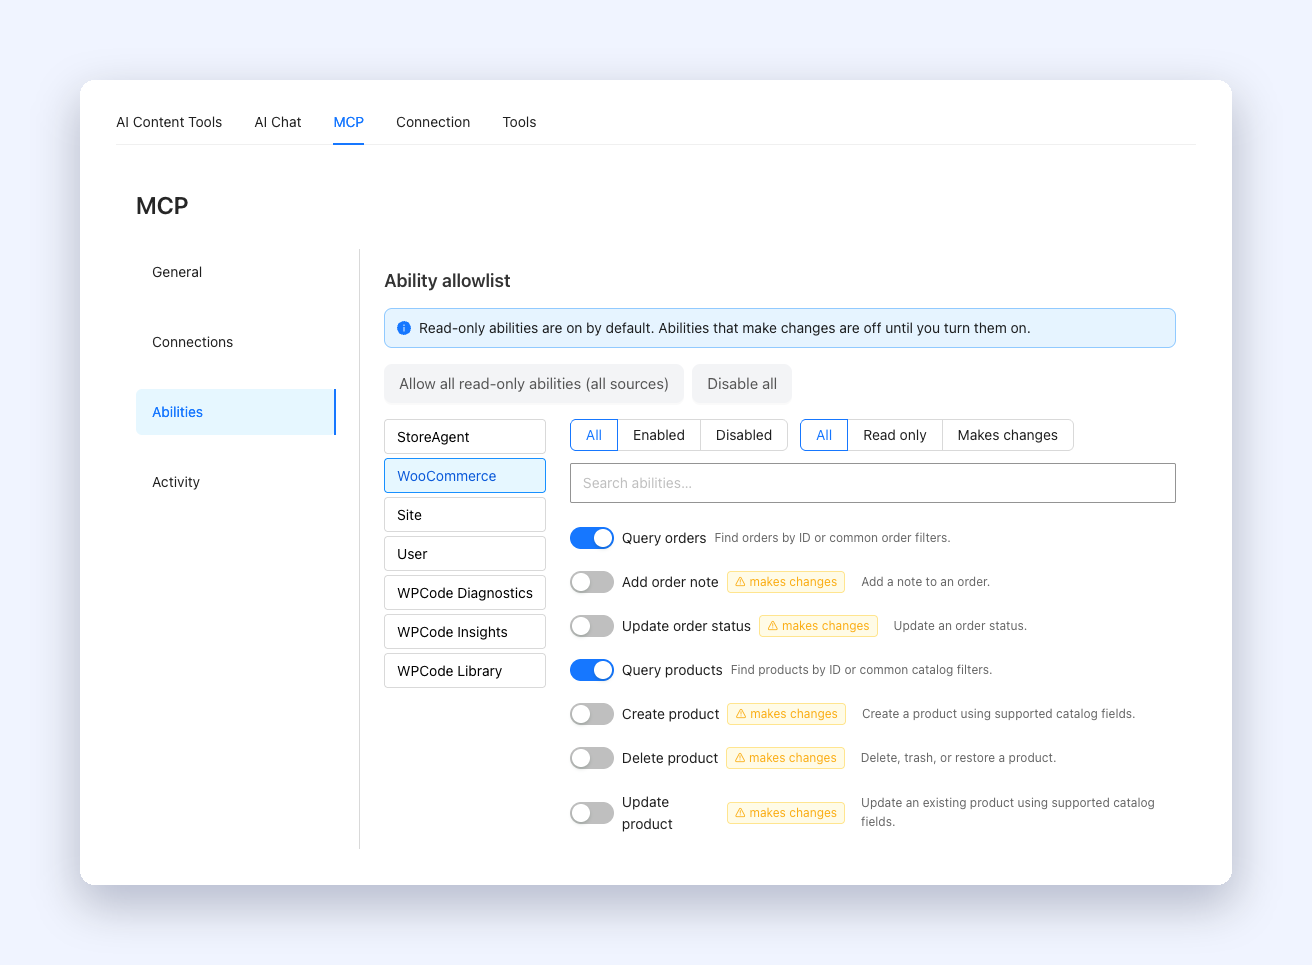
The first move is grouping by source. A source list runs down the left, ordered with StoreAgent first, WooCommerce second, then every other plugin alphabetically. Pick a source and the panel on the right shows only that source’s abilities.
Grouping cuts the job down. You never read five hundred abilities, you read one plugin’s forty, and you already know what that plugin does. A wholesale plugin’s abilities deal with wholesale pricing, a bookings plugin’s deal with bookings, and knowing the source tells you most of what you need before you read a single row.
Each row carries the switch, the ability label, its description, and a ⚠ makes changes badge on anything that writes rather than reads. StoreAgent’s own abilities show no switch at all. They are always available and there is nothing to decide about them.
Filters And Search
Grouping by source handles the bulk of it. Three controls above the ability list handle the rest, and they combine.
- Status filters to All, Enabled or Disabled
- Classification filters to All, Read only or Makes changes
- Search abilities… matches on both the ability label and its internal name, and it is not case sensitive
Filters apply inside the source you have selected, and they reset when you pick a different source. If nothing matches, the panel says No abilities match your filters. and offers a Clear filters button rather than leaving you staring at an empty box.
Searching by internal name is the one worth remembering. If you know an ability is called something like woocommerce/orders-query, you can type part of that and land on it without knowing how the label was worded.
Classification plus source is the combination that does the real work. Pick a plugin, filter to Makes changes, and you are looking at exactly the list that matters: everything that plugin lets an assistant alter in your store. On most plugins that is a handful of rows, and a handful of rows is something a person will genuinely read.
Two Bulk Actions That Save In One Go
Some decisions are not per-ability decisions. Two buttons above the source list cover them.
Allow all read-only abilities (all sources) turns on every read-classified ability across every source. Abilities that make changes are left exactly as they were.
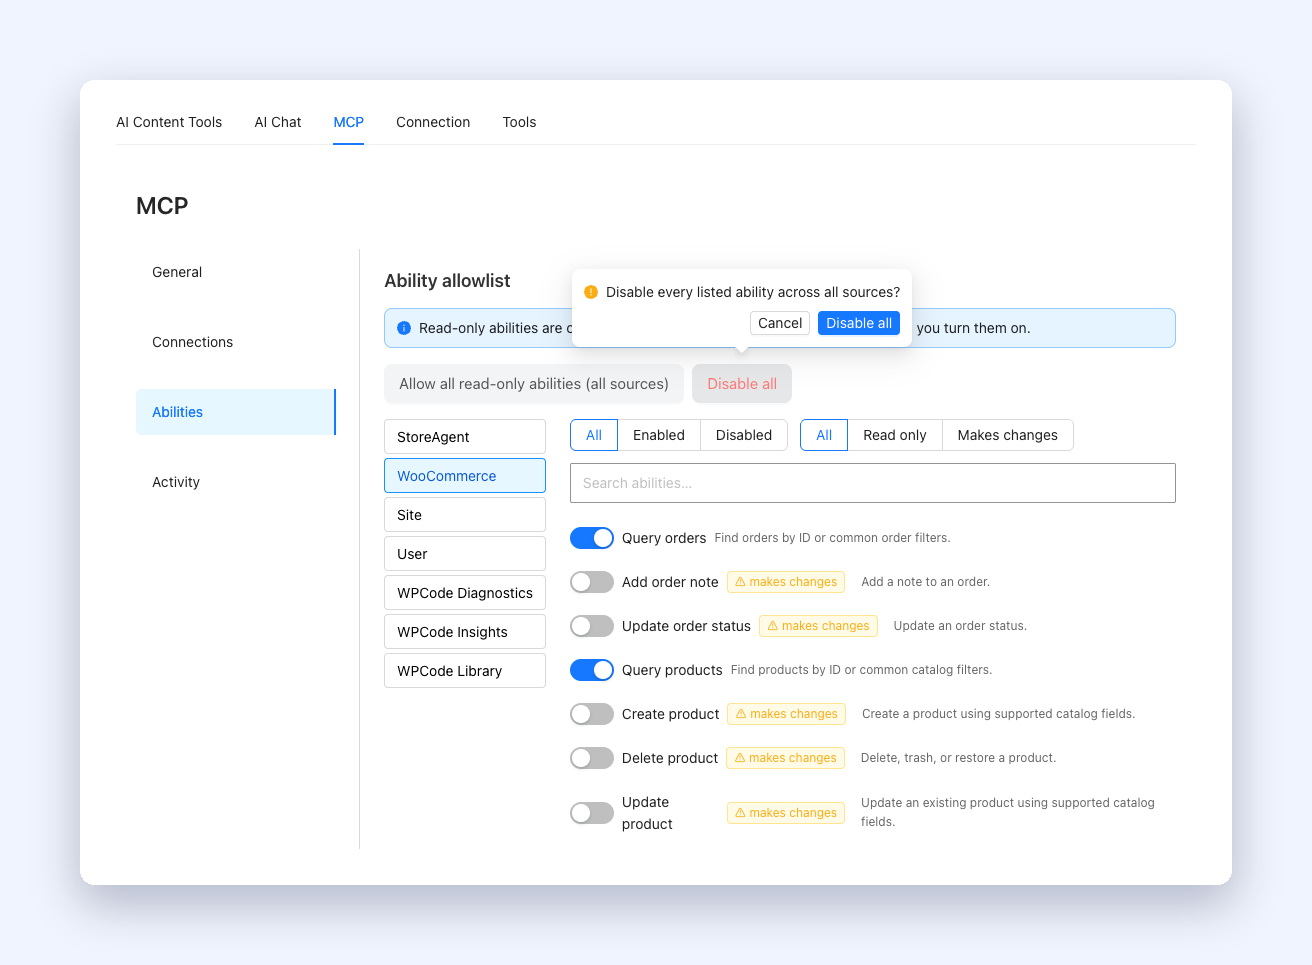
Disable all clears the lot. It asks first, with a confirmation reading Disable every listed ability across all sources?, and you have to choose Disable all again to go through with it. MCP itself stays switched on, so you are turning off what the assistant may do, not the connection.
Both send a single save request rather than one per ability. That is another scale decision: every settings save also syncs to the MCP gateway, so toggling one ability at a time would repeat that work dozens of times on a store with a long list.
One limit worth knowing about. The allowlist caps at 200 entries. If a bulk action would push you past that, StoreAgent refuses the save and tells you the limit instead of cutting the list short, and you turn on the abilities you need one at a time.
Safe Defaults So You Start With Nothing To Do
Most store owners should never need to read the list at all, and the defaults are set up so you do not have to. An info note at the top of the ability browser spells them out: “Read-only abilities are on by default. Abilities that make changes are off until you turn them on.”
An assistant with a read connection can query your orders and products without you allowlisting anything first, because reading is the thing people connect an assistant for. Anything that writes stays off until you switch it on yourself. However many plugins you install, that split holds, and new abilities arriving from a plugin update cannot silently gain the power to change your store.
The switches work in both directions. Turn a read-only ability off and it stays off, and that decision wins over everything else. Turn a write ability on and it joins the allowlist. The difference is just where each type starts.
Link Straight To The Sub-Tab You Need
The URL follows the sub-tab you are on. Open Activity and the address gains subtab=activity. That means you can bookmark a sub-tab, or send someone a link that lands them exactly where you want them:
wp-admin/admin.php?page=storeagent-settings&tab=mcp&subtab=general…&subtab=connections…&subtab=abilities…&subtab=activity
A link with a sub-tab StoreAgent does not recognise opens General. Every link into MCP from elsewhere in the plugin, including the dashboard prompt and the admin notice, points at the General sub-tab.
What This Is Good For
If you have one assistant connected and a light plugin stack, the defaults cover you and you may never open the Abilities sub-tab at all. That is the intended outcome.
The browser earns its keep as the store gets bigger:
- Plugin-heavy stores. When several plugins each register abilities, the source list tells you which plugin is asking for what, instead of leaving you to guess from ability names.
- Auditing a connection. Filter to Makes changes, walk the sources, and you have a straight answer to what an assistant can alter in your store.
- Setting up fast. Allow all read-only abilities gets a research-only assistant working in one click, with nothing able to write.
- Shutting it down fast. Disable all revokes every ability in one action without disconnecting the assistant or turning MCP off.
- Handing it over. A deep link to the Abilities sub-tab is a much better instruction to give a developer or a VA than “scroll to about halfway down the MCP tab”.
Get Started
The Abilities API is still early, and the count on a typical WooCommerce store is only going up from here. We built these settings for the store you will be running in a year, because a design that only handles a twenty-row list would need replacing by then.
To set it up, go to StoreAgent → Settings → MCP, switch Enable MCP for this store on, copy the endpoint URL, and follow the Claude or ChatGPT steps on the same screen. Our guide to the WooCommerce MCP server covers what MCP is doing under the hood if you want the longer version first. Once you are connected, the MCP Recipes directory gives you ready-made prompts to try, and each one lists the abilities it calls.
Not using StoreAgent yet? Take a look at our plans and get your store talking to Claude and ChatGPT.
Frequently Asked Questions
What is an ability?
One specific thing an assistant is allowed to do in your store, registered by a plugin through the WordPress Abilities API. Querying orders is an ability. Updating an order status is a different one.
Where do I find the MCP settings?
Under StoreAgent → Settings. The tab order is AI Content Tools, AI Chat, MCP, Connection, Tools, so MCP sits right after AI Chat.
Do I have to configure abilities before I connect an assistant?
No. Read-only abilities are on by default, so a research-only assistant works straight away. You only open the browser when you want to allow something that writes, or to turn a read ability off.
Why do StoreAgent’s own abilities have no switch?
They are always available to a connected assistant, so there is nothing to allow or disallow. They are listed so you can see the full picture of what is exposed.
What does the “makes changes” badge mean?
That ability writes to your store rather than just reading from it. Creating a product or updating an order status carries the badge. Querying orders does not.
Can I turn a read-only ability off?
Yes. Switch it off in the browser and it stays off. That decision takes priority over anything else.
Does “Disable all” disconnect my assistants?
No. It clears what they are allowed to do. MCP stays enabled and your connections stay in place. Use Revoke on the Connections sub-tab to cut off an assistant itself.
Why did a bulk action get refused?
The allowlist holds up to 200 entries. If the action would go past that, StoreAgent refuses the whole save and tells you the limit rather than truncating your list. Turn on the abilities you need individually instead.
Can I link someone straight to the activity log?
Yes. Add &subtab=activity to the MCP settings URL. The same works for general, connections and abilities.